Wow, this has gone by so quickly! Today is the start of the final week of the EQ Seasons Row-A-Long with free patterns, giveaways and tutorials. On 6 October we are wrapping it up with a big reveal of some of the quilts made!
Find today’s schedule with direct links to each featured blogger at the end of this post, and make sure to visit them all, for free pdf patterns, EQ tutorials and great giveaways on every blog! Read all about the prizes and the rules here.
My Separating Row Design
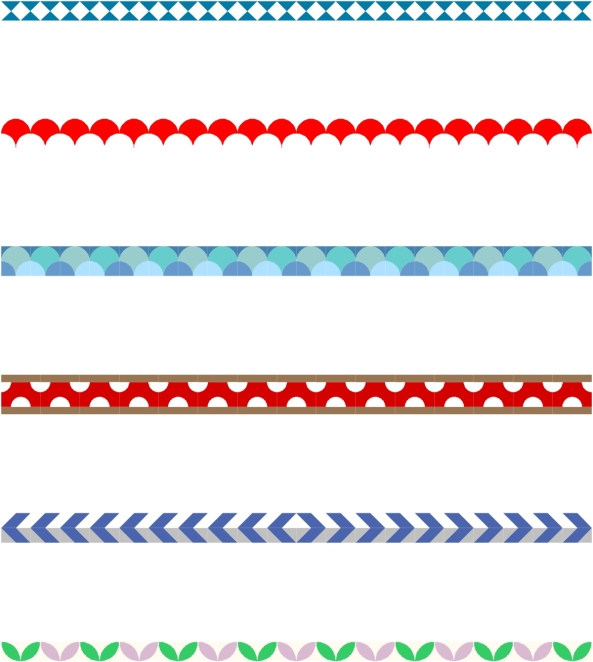
So, those who have been following this RAL, knew what was coming, because there was only one row left from my overview: The New Leaves and Blossom Filler Row.
My notes on this design: 2 inches high – 30 applique shapes – medium skill level – fairly quick to make. I drafted this simple appliqué block myself, based on a pieced Orange Peel block from the EQ Libraries.
My inspiration: the link with the Seasons theme
I think the name ‘New Leaves and Blossom’ says it all: this filler row represents Spring. But in a different coloring, it could be more ‘season neutral’.
About making this row
For making this row, I would use the same fusible raw edge machine applique technique as I described in my pattern for the clamshell row (as an alternative to pieced Inklingo clamshells). In short, it is appliquéing and quilting in one, after assembling your quilt sandwich.
I would place the leaf and blossom shapes on one unpieced background strip, and fuse them in place. I would only stitch the leaves down while quilting the entire sandwich, by straight stitching just inside the edges of the leaves. It is very quick and simple! If you want to take a little more time, you could also use a decorative stitch around the edges, to quilt the leaves down.
My pattern
Download the FREE pdf pattern (2 pages), with fabric yardage requirements, appliqué templates and sewing instructions here: 201505 Annika Kornelis – Instructions New Leaves and Blossom Row – EQ Seasons RAL

Overview of my five separating rows. (And yes, I can count to six, thank you very much! ;-). Check my downloads page for the previous patterns.
My EQ7 Project File
You can download my project file (40.6 KB), with all 5 filler rows, through this link from Box.com. And with the pattern above, you will have a complete file for Annika’s Five Fun and Fabulous Filler Rows! ;-)
Note: You can only open the file if you have EQ7 software. You don’t need the EQ file for participating in the Row-A-Long. It is simply a bonus for those who have EQ7 and would like to play with the designs, like change the colorings and combine several rows from different designers in one quilt layout. If you are interested in doing that, check out today’s tutorial by Heidi Kory on the Do you EQ blog! She shows you how you can assemble all the blocks and rows in one project file!
My EQ7 tutorial: Viewing Multiple Notecards Quickly
This final subject, viewing multiple Notecards quickly, is the reason why I started to make screen recordings of EQ7 (for Mac) for my tutorials. You need to see this in motion!
I recommend you watch this video on full screen, so you will be able to clearly see the buttons on the Notecards. The video (39 seconds) has no sound, so I will talk you through what I am doing, here in writing.
I will post the video again at the end of the tutorial, so you don’t have to scroll up to watch it again, if you missed something.
I have opened an existing project file, that contains quilts and blocks.
I click on the ‘View Sketchbook’ button. → The sketchbook opens, in front of my Quilt Worktable. Part of it is on top of my Quilt Worktable.
I click (and hold) in the grey bar that says ‘Project Sketchbook’. I then drag the Project Sketchbook a bit to the right.
I click the ‘Notecard’ button. → The Quilt Notecard appears. It opens on top of the Project Sketchbook.
At the top right of the Notecard you see two icons and one button. In my previous tutorials I have shown you that the button, marked with an X, is to close the Notecard.
Today I will show you what the two icons do.
I start with the icon right next to the Closing Button, a cross formed by four arrows. When you hover your mouse over it, the cursor turns into that same cross. The four arrows indicate that you can now move the Notecard in all directions.
I hover my mouse over the arrows icon, and my cursor turns into that same icon. Next, I click and drag, moving the Notecard to the left. I release the mouse when I have the Notecard where I want it. For what we are going to do next, you want to make sure both your Sketchbook and your Notecard are in full view.
So the function of the icon with the arrows is to move your Notecard to another position on your screen.
Now, the remaining icon, the pushpin. This also works as a button, and you can use it to pin the Notecard to your screen. A pinned Notecard stays open when you close a quilt or block by selecting a new one.
Normally, the Notecard of your selected item automatically closes when you select a new quilt or block in your Sketchbook. And you have to open the Notecard every time, for each new block or quilt. But with a pinned Notecard, the Notecard stays open, and instantly shows the Notes for the newly selected item! This is a great way to review the Notes in your Sketchbook very quickly.
I am showing you two ways in which this works. But remember, the pinned Notecards work the same on every Tab in the Project Sketchbook, so what I am showing is not specific to either the Quilts Tab or the Blocks Tab, or to my settings.
On the Quilts Tab, I usually have my settings to show only one quilt in the overview. I browse my quilts in a project file by dragging the slider bar underneath the quilt preview to the right. But you could also use the arrow keys on your keyboard.
On the Blocks Tab, I am usually showing several blocks in the overview. I can quickly select blocks or colorings in a more random order that way.
So what I am doing in the video:
After I have moved the Notecard to the left, I move the cursor away from the arrows icon. It returns to its regular arrow shape.
I now move the cursor toward the pushpin icon. When it is near, the cursor turns into a hand with a pointed index finger. It indicates I can now push the pin with that little index finger.
I click the pushpin icon → It turns into a pushed pin icon.
Underneath the Quilt overview in my Sketchbook, I click and drag the slider bar to the right. → All quilts in my Sketchbook are selected, one after another. But I am not watching my Quilt previews, I am only watching my Notecard. It shows a small picture of the quilt, with my relevant Notes. And as soon as a new quilt is selected by the slider bar, the new Notecard information appears.
After I have reached the final quilt, I click the Blocks Tab in the Project Sketchbook → The pinned Quilt Notecard disappears.
I click the Notecard Button → the Block Notecard for the selected block appears. Note that the Block Notecard is in the same position I dragged the Quilt Notecard to. EQ remembers that position, even when you close the relocated Notecard.
I pin the Block Notecard to my screen, by clicking the pushpin icon.
I start randomly clicking blocks in my overview. Each time I click a block, it is selected, and instantly the pinned Notecard shows its information.
I close the Project Sketchbook, by clicking the ‘Close’ button.
End of screen recording.
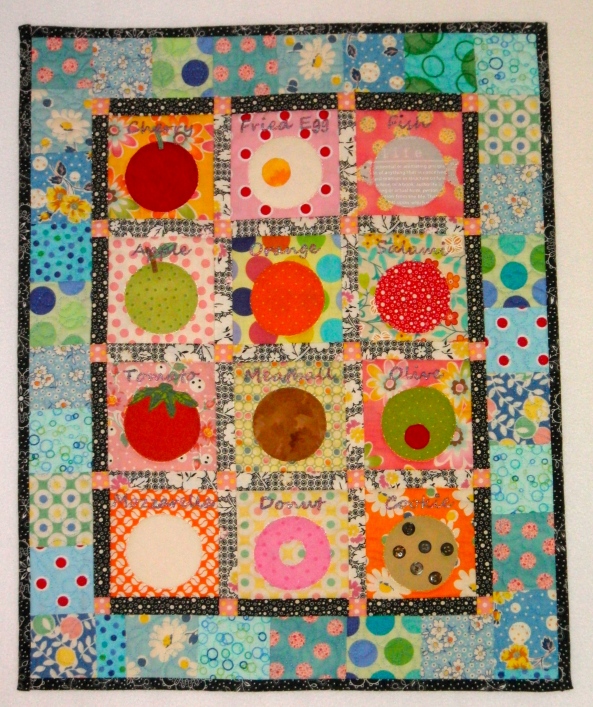
Additional information: The project shown in the video is my 2011 ‘Block of the Month’ project, which was a bit of a joke. I had two versions, the Dutch Delights, [Hollandse Hap] and the English Food BOM. It featured a ‘different’ appliqué block each month.
It really was the same circle each month, just with a different name embroidered above it :-). But it turned into a cute mini quilt all the same, made of only fabrics with dots and circles. You can download my EQ7 project file from this page.
Below, you can watch the 39 second video again:
This was my final EQ tutorial on Notecards. But don’t think I have said all there is to say about Notecards in five tutorials. Oh no…! I have literally only covered the front. But there is a backside too! (At least on the Block Notecards.) If you want to know more about that, check the excellent Help files in EQ, or your manual.
Find a recap of all tutorials here:
Week 1: Checking notecard information for Quilts and Blocks in Project Files.
Week 2: Searching in EQ for Notecard Information, using the ‘Name’, ‘Reference’ and ‘Notes’ fields.
Week 3: Increasing the number of Search Results, from the default 50 up to 999.
Week 4: Editing Notecard Information, also by copying and pasting from outside EQ.
Week 5: Viewing multiple Notecards quickly (tutorial above).
The giveaways (‘sweepstakes’ by law)
Remember, there are giveaways on the other participating blogs, too! Make sure to visit them all. Some of the giveaways are specific to one blog running for one week, some of the giveaways are for all participating designer blogs in the same week.
Northcott Fabric giveaway
This week is your last chance to win one of the great Northcott Fabric bundles! You can enter from 29 September – 6 October. Northcott Fabrics have been incredibly generous. They have given fabric to all participating designers, to help them create the Season rows. And they have been giving away one bundle of 6-8 yards of fabric (in 1 yard lengths) for each week of the Row-A-Long. All entrants from all participating blogs in this week will be entered in a draw together.
You can only enter once this week for this giveaway, so if you are entering through my blog, do not enter through one of the others as well (or vice versa), or you will be disqualified!
The winner will be contacted personally, and announced on www.seamstobesew.com within 48 hours.
EQ7 giveaway!
I want to draw your special attention to this giveaway on the Do you EQ Blog! They are giving away one EQ7 to a lucky winner. That could be you! I love EQ7, as I loved EQ6 and EQ5 before that. Any quilter could use this great quilt designing software. Whether you just want to use it to print your pick of that huge library of block patterns to any size, want to color blocks and quilts with your actual fabrics, or whether you want to draft and design your own blocks in any technique!
Craftsy and Nancy’s Notions Giveaways:
This giveaway is running until 13 October, 2015, for those who sew along. You can win Craftsy classes and Nancy’s notions gift certificates.
For entering, stitch out a block from any of the full size Seasons rows. The smaller Filler Rows (by Bea from Be A Quilter, Linda from the All About Inklingo Blog or by me here on Stof Genoeg) are excluded.
You need to upload a picture of your block to the Flickr Group prior to entering. You may enter this giveaway every day from September 01, 2015 to October 13, 2015 (Once for each unique block you have stitched and uploaded a picture for). After uploading your picture, go back to any of the blogs with the link (not mine) to the giveaway, and enter. All entries will be double checked for compliance to the rules. Find the EQ Seasons Flickr group here.
You will be entered in a draw for the following prizes:
- Craftsy: 1 class of your choice – 3 total classes Average Value $40.00 each
- Nancy’s Notions: 1 $10.00 of gift certificate – 2 total certificates Total Value $20.00.
By entering any of these giveaways, it is assumed that you agree with the rules and guidelines, stated both here and in the giveaway box.
All that is left now for me to do, is give you the schedule of the other bloggers of today:
September 29, 2015
Amy Warner at Sew Incredibly Crazy – Summer
Darlene at Quilt Shop Gal – Winter
Marian Pena at Seams To Be Sew – Spring
Loreen Bogdan at Miss Loreen’s Schoolhouse Quilts – Fall
Heidi Kory at the EQ Blog – A Tutorial On Combining Rows
For those of you with a Facebook account, there is also a Facebook support group.
And next week, there is the big reveal of some quilts made by the other designers. I can’t wait to see that, and especially of course how they did my rows!
XXX Annika


Pingback: 2015 EQ Seasons Row-A-Long Show and Tell! | Stof genoeg
Thank you for the tutorial. Your work is lovely.
Thank you Janie,
I am glad you are enjoying it. That’s why I share!
Annika
Thanks so much for the tutorial on notecards. I saved that part only as a .pdf on print friendly so I can refer to it step by step when I get EQ. You make it so easy! Thanks for your row, too. I’m mind boggled at how small they are – I have to think of them as leaves. =)
That’s great to hear, Susan! And they are new leaves, they only start very small. They’ll grow bigger and darker green… ;-)Annika
Date: Wed, 30 Sep 2015 00:48:56 +0000 To: stofgenoeg@hotmail.com
Another great week, thank you Anneke.. I did not know this about notecards today… so a fun cool tip that I’ll definitely use. Thank you
Thank you Marian,
That’s what I did it for. I had forgotten this myself. But I found it again when I did research for my tutorials. So happy I did! :-)
Annika
Pingback: EQ Seasons Row-A-Long – Free Patterns, Giveaways, EQ Tutorials, Blog Hop, Fun and More | QuiltShopGal
Of course, I used this row, too! Obviously, I’m a big fan of your rows. Love that circle quilt, too!
Hi Carol, Well, I have said it again, but I can’t wait to see what you have come up with!! Luckily, it is now only 7 more sleeps. :-)Annika
Date: Tue, 29 Sep 2015 14:33:20 +0000 To: stofgenoeg@hotmail.com